Showing posts with label Projects. Show all posts

Tuesday, April 7, 2009

How To : Make A Felt Keychain


Here's a super fun & easy, inexpensive little project for you :

How To Make your own Felt Keychain!

What you'll need:

Felt
Keyring
Ribbon or Felt to attach Keyring
Embroidery Thread
Poly-fil stuffing, Cotton, or Cotton Balls (optional)
Fun Felt Shapes or Other Embellishments

1. Cut two pieces of felt to use as the base of your keychain. Can be any size or shape, just cut two of the same. If you're in the need for some templates, try a Google Image search for shapes. Print & cut out desired shape to use as a pattern when cutting your felt or simply free hand it!

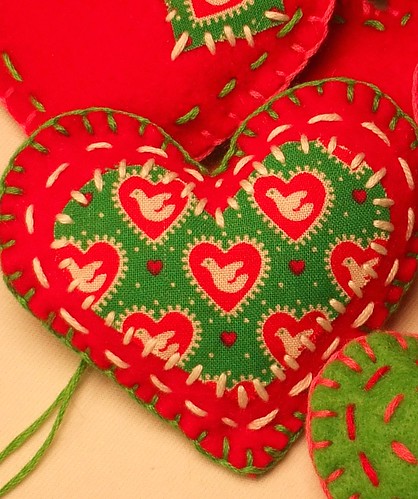
2. Choose your embellishments, cut two if you want a double sized keychain. I've used a little heart cut out of felt & a vintage button, stitched to one piece of felt. If you're not into stitching you can also use felt glue.

3. Take your ribbon or felt that you're using to attach your keyring, put around your ring, and stitch up the end a bit, to hold it in place as your stitching. If you're using felt to attach your ring, you may want to double it up and use a straight stitch or edge stitch to provide extra strength.

4. Put your felt pieces together and blanket stitch around the edge, when you come to where you'd like your keyring, continue using the blanket stitch or switch to a straight stitch/back stitch to provide extra strength for your ring. If you'd like to learn a blanket stitch here's a great tutorial.

5. Once you get towards the end, you can add some poly-fil stuffing to make your keychain a little fluffy or leave it out for a flatter look! Finish up your stitch & you have an adorable felt keychain!


(P.S. This would also make a super great Zipper Pull Project, just replace your keyring with a removeable hook!)

P.S.#2 - In case you're still reading this Tutorial - its also a Surprise GIVEAWAY! If you'd like this neat little Felt Heart Keychain mailed to you - Leave a comment and tell me about a tutorial you'd like to see on the blog, show me a tutorial on your blog, or link me to your favorite tutorial elsewhere!! Don't forget to leave some contact info so I can get back to the randomly selected awesome Winner! You have until Friday, April 10th @ Noon to participate!


Related Posts Widget for Blogs by LinkWithin

Friday, April 3, 2009

Flickr Picks : Lova Revolutionary Blog Pool


Come one, come all! Join me on Flickr, make friends, find awesome handmade, & post for a chance to get featured every Mon, Wed, & Fri! The group gained a bunch of new members this week, and I hope to see more crafty peoples & fellow Etsians! Come on you know you wanna join!


Saturday, March 28, 2009

Special Order : A Handmade Proposal!

Spring time is almost here so that means time for wedding & baby season. It also means its a perfect time for handmade gifts! I've been selling quite a few knit baby beanies lately and also had the pleasure of helping out a fellow Estian with a marriage proposal! I've had a lot of requests for fortune cookies with custom messages but had yet to get around to working out the details (so many projects so little time)! But when I got this custom request it was hard to say no & hopefully they won't either. Of course, I can't see anyone refusing an awesome proposal like this! This little memento will also make an exceptionally cute keepsake! So happy I could be a part of such a neat & important surprise! (Leaving out the details as to not ruin perfectly awesome surprise, hopefully will get to post about this cute couple later!)


Thursday, February 5, 2009

Food Love : Virginia is for Lovers Glazed Sugar Cookies!

Baked these delicious little cookies last night for the BF, who happens to love grocery store smiley face cookies. I'm not sure if all grocery stores have these but locally, we have a grocery store named Giant that sells these big sugar cookies with old fashioned glaze frosting and they are delicious! So delicious, I had to hunt down some comparable recipes and try to make them myself, its really difficult to eat just one! I got the VA shaped cookie cutter at Thomas Jefferson's Monticello when I visited there over the summer. It's pretty neat, check it out if you're ever in the middle of VA. Honestly, you won't find much else in the middle of VA so you might as well. Or actually, check out Madison's Montpelier instead, its bigger and there's an indoor bowling alley.


Here's the recipe:


I found a no-roll sugar cookie recipe over at Bettycrocker.com that is delicious, so you can just roll the dough into balls and then smash with the bottle of a glass, or you can chill the dough & roll it...I rolled these last night and it worked just fine! The glaze recipe was also found on the net but I can't remember where - I recommend doubling or tripling the recipe for enough frosting for an entire batch!


No Roll Sugar Cookies:

1 Cup White Sugar
1 Cup Powdered
1 Cup Buttery or Marg. Softened
3/4 Cup Vegtable Oil
2 Tablespoons Milk
1 Tablespoon Vanilla
2 Eggs
4 1/4 Cup Flour
1 Teaspoon Baking Soda
1 Teaspoon Cream of Tartar
1/2 Teaspoon Salt


- Mix wet ingredients until creamy and then add dry ingredients until well blended, Cover, & Chill until dough is firm. Roll dough out or (Shape Dough into balls and roll in sugar, if you just wanna make delicious sugar cookies, skip this step if you use the glaze frosting), cut & place on ungreased cookie sheet (and if you don't decide to roll the dough, flatten to 1/4 inch thick with bottom of glass), Bake at 350 degrees for 10 - 13 minutes.


Delicious Glaze Frosting (like Grocery Store Smiley Face Cookies):

1 Cup Powdered Sugar
2 Teaspoons Milk
2 Teaspoons Corn Syrup
1 /4 Teaspoon Vanilla
Food Coloring of Choice

Stir Powdered Sugar, Milk, Corn Syrup, & Vanilla until it is smooth & glossy, if it is too thick add more corn syrup. I added about 2 more teaspoons to this recipe to get the right consistancy.


Sunday, December 28, 2008

Crafty Things : What I made for X-mas!


Felt X-mas Hearts for the Ladies.


Felt Fortune Cookies with Faces for the Dudes.


Felt Monster & Bird Pins for the little ones.

Wednesday, December 3, 2008

Way Cute Project from Paper and Stitch - Holiday Gift Wrapping

Holiday Gift Wrap Tutorial for Type Lovers @ Paper and Stitch


December 2, 2008

Here is another wonderful idea from Laura of Lupin! This one I am DEFINITELY going to use because I have some loved ones that are pretty interested obsessed with type. Again, make sure to check out Laura’s shop, right here and blog right here! Take it away Laura (I just love having her as a guest poster)…

Most gifts I wrap involve a tag somewhere along the line, but for a few parcels this year I’m skipping the tags and using names and other messages as the decorative element:

The idea behind this look is really simple - though it takes a little time to put into practice - and will make your parcels really stand out! I think it’s an ideal way of decorating gifts for men and boys who (let’s be honest now) probably have no interest in a “pretty” or “chic” looking parcel and can’t undo a ribbon to save their lives. This is certainly the giftwrapping idea which has had the most positive response from my boyfriend!

First up you need to make some letter templates. Print out the letters you need using your computer - you’ll need a pretty big font size but this will depend on the size of the presents you’re wrapping, and remember to set them as “outline” to save ink! I used Arial set to bold to make nice fat simple letters, and I should have printed out a whole alphabet in different sizes to save time as I just kept thinking of more people this idea would be great for.

I just printed my letters onto paper but if you wanted to use them a few times (or just to make using them easier) you could print onto card instead. Cut them out and you’ve got your templates:

To really save time you could print the letters directly onto coloured paper… but doing it the long way you can use a variety of decorative papers or use up all those small pieces of giftwrap you get left-over after wrapping your parcels. Draw round each letter with a pencil and cut it out, remembering to reverse the letters so they’re the right way round when you turn them over (if that makes sense!). Then use some prittstick-type glue (something light that won’t seep through the wrapping paper you’ve used) and stick your message onto your parcel.

I used bright red giftwrap on nice shiny gold paper for nephews and neices who like something cheerful…
.

.. and more muted, subtle choices for our friends - vintage sheet music and an old map of London…

… and lovely gold lettering on kraft paper, which is probably my favourite:

I’m sure you can think of lots of variations - letters cut from pictures in glossy magazines for example would work really well on brown paper, and plain white letters (nice and easy to print straight from your computer) would also look pretty cool.


Love this tutorial! I think I'm gonna try it!

Monday, October 13, 2008

Fun & Easy Tote Bag Project over @ Hollabee Blog : hollabee.blogspot.com

I thought this was a really great tote bag tutorial and easy as pie - published by hollabee.blogspot.com - Hollabee also has a great shop over at etsy and some really fantastic fabric I hope to snatch in the near future!


Thursday, October 2, 2008

Lova Revolutionary Vintage Owl Gift Tag Trio featured on Brownowls.blogspot.com

Awesome! My LovaHandmade : http://lovahandmade.etsy.com : Retro Owl Gift Tag Trio was featured on brownowls.blogspot.com! A delightful little blog about crafty stuff and owl cute stuff!


These very cute gift tags were snatched before I could post them for sale on my newly introduced handmade shop at etsy! Find similar tags and cute stuff @ http://lovahandmade.etsy.com! These tags are made from cardstock, vintage ric rac, and a vintage print that was damaged but still cute and useful! More Lova Revolutionary Handmade items coming in the near future....stay tuned!

Tuesday, August 26, 2008

Head to Red Bank for a day of shopping - app.com

BY SHEILA VALECILLOS
Staff Writer

Red Bank offers a variety of places to shop and embodies the best of all worlds, from art galleries and clothing shops to casual and elegant dining.

Backward Glances

Stop for a taste of the past at Backward Glances.

Open since 1985, this shop attracts shoppers with its variety of vintage items, said Cindy Ciullo, manager and owner.

Clothing, footwear, sunglasses and jewelry are some of the items found in the store.

"Vintage is something I always loved, and we have authentic vintage clothing and things you remember from your childhood; that's what's so interesting about it. We have clothes that range from the '40s to the '80s for reasonable prices," Ciullo said. "It's like having a little piece of the past, something unique that people can wear and they won't see other people wearing the same outfit."

Backward Glances, 43 Broad St., is open from 11 a.m. to 9 p.m. Mondays through Thursdays, from 11 a.m. to 10 p.m. Fridays and Saturdays, and from noon to 6 p.m. Sundays.

For more information, visit www.backwardglances.com or call (732) 842-9156.

The Antique Center

The Antique Center has been the destination for dealers, decorators, stage designers and collectors since 1964, said owner Guy Johnson, 57, of Red Bank.

"My mother started the business, and I got in full time in 1970 after I graduated high school," Johnson said.

"It's worth the trip to discover and find that special something," he said of the shop.

The Antique Center offers unique glassware, china, furniture, silver, art, pottery, custom jewelry, vintage coats, hats, clothing and many collectibles and antiques.

"There's a little bit of everything," he said. "We've got two buildings — one carries the big stuff, like the furniture, and the other one carries the small stuff, like clothes and jewelry."

Johnson said people from all over the world come to see the shop.

"Mostly Japanese and Germans come to buy antique artifacts, and then they send them to their countries. People are just fascinated with all the different, interesting items the shop offers," he said.

The Antique Center, 226 West Front St., is open from 11 a.m. to 5 p.m. Mondays through Saturdays and from noon to 5 p.m. Sundays

For more information, visit www.redbankantiques.com or call (732) 842-4336.

Sunshine Daydream

Sunshine Daydream was opened by Amy Jones, 34, of Island Heights and Erin Galante, 33, of Toms River. These sisters always shared a passion for jewelry and business, Jones said. Over the years, they designed and created unique jewelry and sold it to various stores across the United States, Jones said.

"My sister and I designed jewelry for about 10 years, and we exhibited our work at festivals all around the northeast," she said.

"We decided to open our first retail store, also called Sunshine Daydream, four years ago in downtown Point Pleasant Beach, and we opened the one in Red Bank about a year ago," she added.

The shop offers jewelry, including necklaces, bracelets, anklets, earrings and hair accessories, and has a bridal department in the back of the store where they sell bridal shoes and veils. The jewelry comes from all over the country.

"I think we really stand out because we're very affordable, and we have people come in, they can buy a gift for under $20 and they can have it wrapped for free. I think people really enjoy that factor of it; they come in and they feel like they're buying something that's worth $60 dollars, and it only costs $20 dollars. People just love it," she said.

The shop has a very no-pressure type of atmosphere, she said.

"In the store people come in, they shop and look around," Jone said. "We're always here to help them."

The shop, at 80 Broad St., is open 10 a.m. to 6 p.m. Mondays through Saturdays, and 11 a.m. to 5 p.m. Sundays.

For more information, visit www.sunshine-daydream.com or call (732) 741-0060.

New York Trends

Opened in 2008, New York Trends offers a unique selection of clothing with Manhattan style for reasonable prices, said owner Patricia Keating of Edgewater.

"I bought the store in 2007, however, it's pretty much the same store, same name, and we tried to keep the same products targeting the trendy. We focus on young teenagers all the way to older, contemporary women in their 40s," she said.

The shop's most popular items include a variety of dresses, handbags, jewelry, tops and shirts.

"A lot of our clothing comes from California. We have prom dresses, cocktail dresses, sun dresses. Prices are very affordable, and that's why we kept the name, because it's known for trendy, contemporary fashion clothing."

Keating loves the fact that on a busy day, the shop sees a mix of patrons, from young teenagers to older women.

"It's a universal store," she said.

The shop, 43 Broad St., is open from 11 a.m. to 6 p.m. Mondays through Thursdays, 9 a.m. to 11 p.m. Fridays through Saturdays and noon to 6 p.m. Sundays.

For more information, call (732) 345 8222.

The Bees Knees

Kristen Winter of Rumson and Megan Deo Priore of Fair Haven are the owners of The Bees Knees, open since 2004.

This boutique offers preppy yet funky women's clothing at reasonable prices, Deo Priore said.

"We have been best friends for many years, and we both always shared a passion for fashion and we love shopping," she said.

One of their favorite things to do was to take trips together to see what new boutiques they could find and what new designers clothing they could bring home with them, Deo Priore said. "Since we were both raised in Red Bank, we knew the lack of boutique shopping here, and we wanted to really make a difference," she said.

The shop offers dresses, ties, jackets, footwear, accessories and jewelry.

"People love coming here because we only have a few . . . of one item, so everything is very unique," Deo Priore said. "People do a lot of gift shopping, and we wrap for free."

The shop, 24 Broad St., is open from 10 a.m. to 6 p.m. Mondays through Fridays, and noon to 5 p.m. Sundays.

For more information, visit www.thebeeskneesboutique.com or call (732) 758-1900.

Red Bank has a variety of shops to choose from; these are only some shopping suggestions. The borough's shops include those that sell footwear; cards, flowers and books; clothing; artwork; gifts and collectibles; health and beauty items; jewelry and accessories; music-related items and electronics and video equipment.

For more information, call the Red Bank Chamber of Commerce at (732) 741-0055.

Saturday, July 26, 2008

Cute Easy Project: Monogram Doormat


Your front door can go a long way toward making a home feel welcome, and this customized doormat is the perfect first step.

Materials:
family initial stencil
manila folder
yardstick
pencil
coir doormat
low-tack tape
spray paint in dark green
old newspapers
utility knife

1. Print a family initial (or fun words) using a bold font and enlarge the letter so that it is approximately 6" tall.

2. To make the stencil, tape the piece of paper with the letter on it to a manila folder. Trace around the letter with a permanent marker-- the ink will bleed through the paper, leaving an outline on the folder. Cut out the letter (use a utility knife to cut out the inside of the letter).

2. Tape down the letter on the mat where you want it,placing the tape on the back of the letters. Don’t forget to tape down the inside of the letters you cut out, if you need them.

3. To add stripes, apply 2 rows of tape to the doormat, 2" from the top and 1" apart. Repeat this across the bottom of the mat, using a yardstick to help get the stripes straight or making the lines slightly askew. Cut away the blue tape where the lines intersect one another.

4. Tape off the rest of the mat with old newspapers, so you will get paint only where you want it. Press down firmly on the tape before spray-painting to ensure that it has adhered to the mat.

5. Working on old newspapers and in a well-ventilated area (outside is best), stand above and at least 12" from the doormat and spray-paint the mat, being careful not to get the paint under the taped area (standing directly above the mat works best). Allow to dry, then remove tape.


http://cathiefilian.blogspot.com/2008/07/episode-406-under-10-gifts.html

Thursday, July 3, 2008

Fourth of July BBQ Party / Cute Picnic Project from Design Sponge


Custom Condiment Carry All for the 4th of July!


july 4th is right around the corner, which means one thing: barbecue season has begun! so bust out the burgers and tofu dogs and don’t forget to b.y.o.b! at the end of the day you’re certain to have a little sunburn and a lot of empty six-pack holders lying around. with a bit of gift wrap, these simple cardboard constructions can be transformed into super handy condiment and picnic supply caddies for your next shindig. for larger gatherings you can put one on each table, and when summer is over they’ll make great holders for knitting needles, paintbrushes or pens and pencils. just click here for the full project instructions or click “read more” below.

have a safe and fantastic 4th!
-derek & lauren

here’s what you need:
-empty cardboard six-pack holder
-decorative paper such as giftwrap or wallpaper
-rubber cement
-pencil
-scissors

1. flatten the cardboard caddy and trace around the shape onto the backside of your paper. Cut out two pieces.

2. apply an even coat of rubber cement to the backside of your paper and the cardboard. let sit for a minute, then smooth paper onto carboard.

3. fill with ketchup, mustard, salt, pepper, forks, napkins, etc.!

4. party! party! party!